SetUp PRO.FILE
Connecting PRO.FILE takes three steps. The first one belongs to whoever maintains your PRO.FILE installation. Nothing else can be done until that is in place.
Prerequisites
Your PRO.FILE maintainer needs to set all of this up
A PRO.FILE service account for amber, with a license assigned (normally full-use). Without one the account looks fine in the desktop client but cannot sign in to the interface amber uses.
Sign-in permitted, with a username and password set in PRO.FILE
IIS Basic Authentication switched off on the site hosting the AppServer.
Network access to the AppServer address and port.
Amber indexes only what the service account can see, and each user still sees only the documents their own PRO.FILE permissions allow.
1. Prepare PRO.FILE and the AppServer
1.1. Create the service account
Create a PRO.FILE account for amber:
A license assigned to the account (normally full-use).
Sign-in permitted, with a username and password set in PRO.FILE.
1.2. Switch off IIS Basic Authentication
The PRO.FILE AppServer runs on IIS. On the IIS site hosting it, open Authentication and set:
Anonymous Authentication — Enabled
Basic Authentication — Disabled
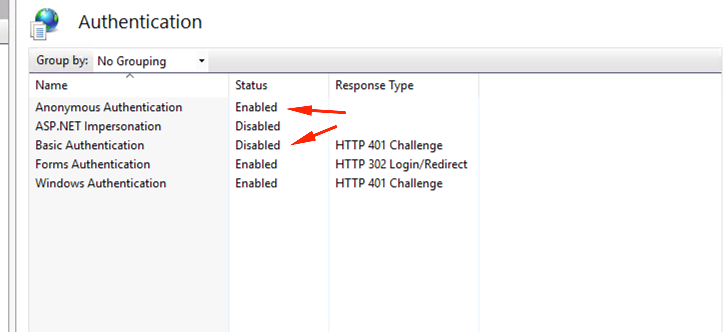
IIS Manager → the AppServer site → Authentication. The two rows that matter are arrowed: Anonymous Authentication: Enabled and Basic Authentication: Disabled. Leave the other rows as they are.
Why this matters
Why this matters
amber still signs in with a username and password. But while IIS Basic Authentication is on, IIS checks them against Windows accounts and rejects PRO.FILE ones before PRO.FILE sees them. The most common cause of a correct login being refused.
1.3. Optional: Open documents in PRO.FILE
Amber offers an Open in PRO.FILE action that opens a document in the desktop client. To enable it, send amber your SmartLink target as well. Your PRO.FILE maintainer has the exact value, which looks like server-name/db(tenant).
2. Collect the connection details
Four values, all of which your PRO.FILE maintainer can confirm:
3. Share the details with amber
Securely share the server address, tenant, username and password with the amber support team.
Was this helpful?